Tutorial: Icarus Verilog (+GTKWave)
11 May 2019
This post is a copy from my old website and blog. It was originally authored on 2018 December 30. I have made some revisions since.
Introduction
Icarus Verilog is a free Verilog simulator with some SystemVerilog support.
I personally enjoy using it because it’s really easy and quick to get it up and running.
Icarus Verilog compiles the Verilog source into a file that is executed by its simulator vvp.
GTKWave is a free waveform viewer, which is useful for debugging designs.
This tutorial is intended for people who already know about digital logic design and Verilog but aren’t familiar with Icarus or GTKWave. It’s not a deep dive into either, but will get you up and running designs. If you want to get further into it, I suggest looking at the manuals for the tools.
Dependencies
I’m writing this tutorial with the intent that it be used on a *nix system. Icarus and GTKWave do have Windows binaries, although I haven’t really looked into or tested them.
I will be using Makefiles in this tutorial so you’ll need some way to run make.
From light research, Windows does have some options for this.
If you’re using Windows, an option would be to use the Windows Subsystem for Linux (WSL), albeit GTKWave is a graphical application: you’ll need to do some X server shenanigans to get those to work, and as of the (original) writing of this post that’s not officially supported. You could also install a Linux VM on something like VirtualBox and use that.
Getting the tools
Icarus Verilog is available here. If you’re using Linux there’s a good chance that your package manager has it in its repositories, so it’ll be as simple as installing a package. If you’re using macOS, there should be a Homebrew package for it. If you want some more SystemVerilog support, you’ll probably want to install a development version (e.g. from master on the GitHub repo).
Likewise for GTKWave, you can find it here and there’s a good chance your package manager has it already.
Getting started
First, let’s create a directory to do this in. I’ll be using shell commands in a terminal.
$ mkdir icarus-tut
$ cd icarus-tut
Let’s write a basic Verilog module. A counter is a nice, simple design.
Create a file named counter.v and open it in your preferred editor.
/**
 * 4-bit counter
 */
module counter
(
    input  clk,      // posedge clock
    input  clr,      // synchronous clear
    input  en,       // enable: if high, increment counter
    output [3:0] cnt // counter value
);
    reg [3:0] cnt_reg, cnt_next;
    assign cnt = cnt_reg;
    always @(*) begin
        cnt_next = cnt_reg;
        if (clr) begin
            cnt_next = 4'd0;
        end else if (en) begin
            cnt_next = cnt_reg + 1;
        end
    end
    always @(posedge clk) begin
        cnt_reg <= cnt_next;
    end
endmodule
Now let’s write a basic testbench which will increment the counter 32 times.
Create a file named test_counter.v and open it.
`timescale 1ns/100ps // 1 ns time unit, 100 ps resolution

module test_counter;
    reg clk;
    always #5 clk = !clk;

    reg clr, en;
    wire [3:0] cnt;
    counter counter_0
    (
        .clk(clk),
        .clr(clr),
        .en(en),
        .cnt(cnt)
    );

    integer i;
    initial begin
        $dumpfile("wave.vcd");      // create a VCD waveform dump called "wave.vcd"
        $dumpvars(0, test_counter); // dump variable changes in the testbench
                                    // and all modules under it

        $monitor("t=%-4d: cnt = %d", $time, cnt);

        clk = 0; clr = 1; en = 0;
        @(negedge clk);
        clr = 0; en = 1;

        for (i = 0; i < 32; i = i + 1) begin
            @(negedge clk);
        end

        $finish();
    end
endmodule
There’s nothing too special about the testbench.
The noteworthy part is the $dumpfile() and $dumpvars() calls,
which handle outputting a VCD file for a waveform viewer (e.g. GTKWave) to open.
Invoking Icarus
$ iverilog *.v
No, seriously, that’ll do the job. iverilog is the program used to compile the Verilog source code.
This will compile all of the Verilog files (with the glob/wildcare for the .v extension) and produce
an a.out file, similar to what GCC does when you don’t specify an output file.
To run the file:
$ vvp a.out
iverilog will produce a compiled file which can be run using vvp with the compiled file as a parameter.
You can also run the file directly (e.g. $ ./a.out) since it’ll be set as executable: I do not advise this.
If you open it up, you’ll notice that it’s actually a plaintext file with a shebang to use vvp: running
the file directly is dangerous since iverilog is compiled with the path to vvp for your particular installation,
so if you share your compiled file with someone else who has a different installation path, running it directly won’t work.
Explicitly invoking vvp mitigates this issue.
Now that’s all well and good, there’s some more useful parameters that iverilog can take:
-o allows you to specify the output file,
-s allows you to specify the top level module that you want to simulate (if you have multiple top level modules
i.e. no other module instantiates it, it’ll run all of the top level modules if you don’t use -s).
There are other useful flags a la GCC, like -I to specify an include path and -D to define a macro, as well
as -g to specify the “generation” of Verilog you want to use (useful to enable certain features).
The rest of the arguments are for source code files.
So let’s take advantage of these flags:
$ iverilog -o test_counter.vvp -s test_counter *.v
This will now produce test_counter.vvp as the output executable
using the test_counter module as its top module. I put a .vvp extension
on the output file to make it easier to filter for.
Now this is all well and good, but it gets tiring having to type this out every time, so let’s write a basic Makefile.
I’m no expert at writing them and the discussion on Makefiles is out of the scope of this tutorial: this is just a basic one.
You can go nuts with it if you want.
Create a file called Makefile and open it.
TOP = test_counter
SRC = counter.v
TEST_SRC= test_counter.v
BIN = $(TOP).vvp

$(BIN): $(SRC) $(TEST_SRC)
	iverilog -o $(BIN) -s $(TOP) $(SRC) $(TEST_SRC)

.PHONY: all clean test

all: $(BIN)

test: $(BIN)
	vvp $(BIN)

clean:
	rm -f *.vvp *.vcd
Now you can run the test target:
$ make test
After you run the compiled file, you will get the prints from the $monitor() call in the testbench.
Also note that the file wave.vcd is produced. We’ll open this with GTKWave.
Running GTKWave
All you have to do is run this command:
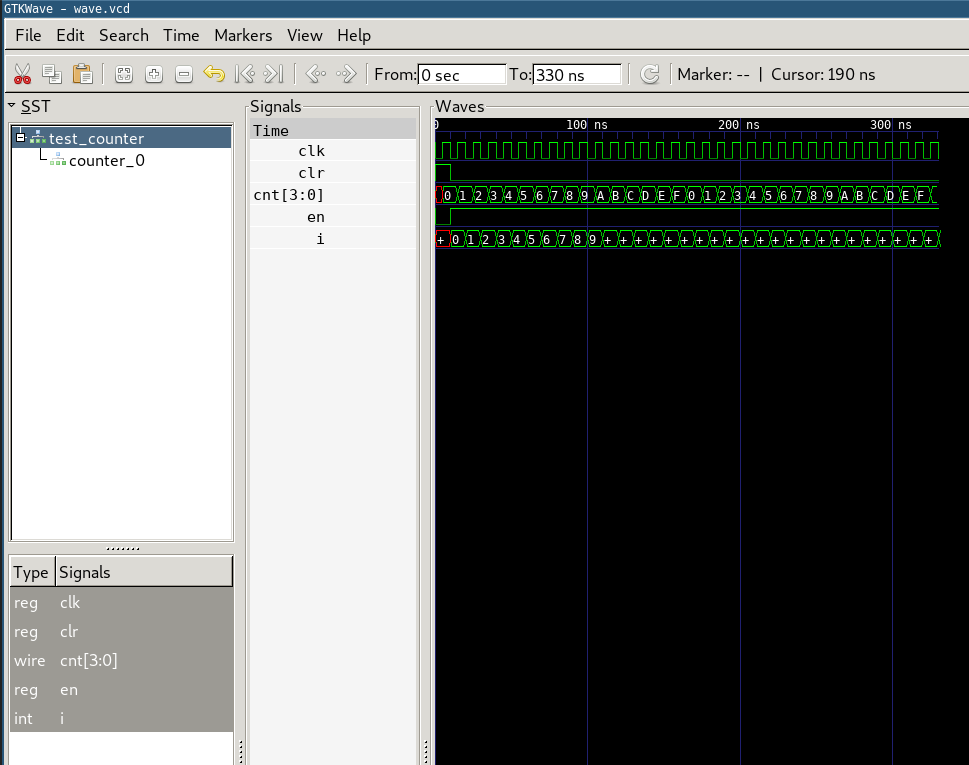
$ gtkwave wave.vd
This will run GTKWave and open the waveform file. In the section called “SST”, you can click on modules and examine their hierarchy then select signals and drag them into the “Signals” section. When you do that, you’ll see the waveforms pop up!
You could also add a Makefile target to invoke GTKWave.
Conclusion
That’s pretty much it! Pretty simple, huh?
In summary:
- Get your source code
- Invoke
iverilogto compile the code -
iverilog -s <top module> -o <output executable> <verilog source files>
- Invoke
vvpto run the compiled file -
vvp <output executable>
- Invoke
gtkwaveto view dumped VCD files -
gtkwave <VCD file>